
We love adventures. Whether you’re ice climbing, four-wheeling in the desert, or exploring the deepest backcountry, we approve. But what happens when things go south? What happens when the weather turns on you or your transportation plans fall through? What happens if you become lost or injured and need to hunker down for the night?
One of the scariest things about an emergency situation in the wilderness is the rapid approach of night. The weather gets colder, visibility disappears, and you begin to feel more exposed and vulnerable. What’s even more dangerous is the weather itself. It could be freezing winds, rain, or scorching sun, but all of it can kill you if you aren’t careful.
And I know what you’re thinking: “Dude, this is not making me want to go on an adventure.” But fear not, because while emergency survival situations are rare (and often preventable with proper planning), it’s important that we acknowledge them and prepare for them. We’ve talked about packing the essentials and how important it is to bring plenty of water and tell people where you’ll be, but in emergency survival situations, one of your first priorities should be building a shelter.
When your life is on the line, you need to conserve resources, the greatest of which is energy and mental sharpness. Nothing can deplete your health and stamina faster than exposure to rains, cold, or sun. Creating a safe place to recover should be a top priority in these situations, and you’ll need to know the best kind of shelter for each environment.
So, in a fortuitous stroke of serendipity, we’ve put together the basics of building an emergency shelter that will protect you in any environment. But before we share them, we need to talk about tarps.
Obviously, there are a ton of things that you can pack that would make your emergency survival experience a bit more luxurious. But when you’re prepared with a double-insulated tent, sleeping bag and pad, gas stove, fireproof matches, a gallon of water, 6 episodes of This is Us downloaded on your iPad, and an acoustic guitar that your cousin says was once played by Stephan Jenkins, you’re not really in an emergency survival situation, are you?
If you aren’t sure if you’re in an emergency situation, just remember this: If you’re trying to remember the chord progression for Jumper, you’re probably fine.
Why You Should Always Carry a Tarp
While you can’t always predict the future or carry an entire campsite around at all times, there is one thing you should ALWAYS have on hand. Not sitting in your trunk or in your garage in a box labeled “camping stuff,” but accessible to you at all times, no matter what. And that’s a tarp.
One of the most useful, versatile, durable, and badass tools you can possess, a tarp is going to be a literal lifesaver in almost any emergency survival situation. If there are two other items that I can suggest keeping handy, they are paracord and a bivy sack.
Paracord is useful for approximately 2 zillion different things, PLUS you can braid them into neat little wristbands that are practical, but also tell the world that you’re super-outdoorsy. Bivy sacks come in many varieties with tons of different features, but even the most basic model will make a world of difference. The most basic bivy sack on Amazon will set you back about $12.50, weighs in at just over 4 ounces, and fits in the palm of your hand.
Plus, it comes with a free whistle and free one-day shipping for Prime members, so…
Anyway, let’s assume you at least have some kind of tarp on you. Now it’s time to talk about shelters. The first thing you need to figure out is what kind of weather you’re dealing with. What is the biggest threat presented by your environment? Read on for essential emergency survival shelters based on the types of weather conditions you may face.
Enjoy!
Gentle Weather
When the weather is agreeable and you just need a bit of shade in the day and a windbreaker at night, your emergency shelter options become very simple.
The Lean-To Shelter
A lean-to is one of the simplest ways to keep basic sun, wind, and even a bit of rain outside where they belong. A lean-to requires simply that you find some type of ledge, fallen tree, or large rock. You then collect branches or limbs and lean them against the top edge. This is your frame.
Cover the frame with bark, brush, or your trusty tarp and you’re pretty much set. Remember to make your lean-to just as big as you need it. This will require less materials and make is easier to keep warm.
The Ramada Shelter
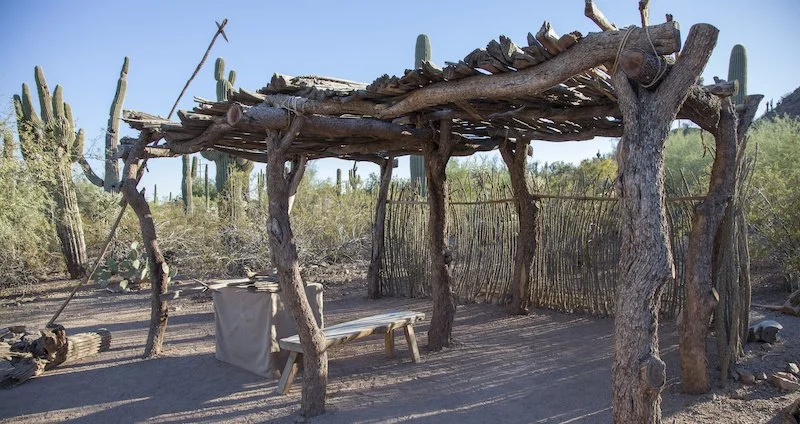
A ramada is another basic kind of shelter that is primarily good for keeping the sun off your skin, and possibly providing some wind protection. The ramada can also be a bit harder to build, as they generally require four posts, some beams, and roofing. (Again, a tarp will make this a much easier and more efficient build.) You can also use a tarp or some branches to create a removable wall that will offer a bit of wind protection. When considering a ramada, remember that the shelter is exactly like the motel brand: it’s not great, but it’s much better than nothing.
The Tarp Wing Shelter
Photo Courtesy of: Zachary Collier
You may also want to consider a tarp wing in conditions where rain is your main obstacle. You build this by securing opposite corners of your tarp up high and the other two down low. This setup doesn’t offer protection from the wind, but it can be extremely effective at keeping the rain off your campsite or fire. It’s also not a bad way to create a nice shady patch if the sun is your biggest nemesis.
Medium Weather
The A-Frame Shelter
Probably the most common, easy, and effective emergency survival shelter is the A-frame. As long as you have your tarp, you can construct an A-frame shelter in a matter of minutes.
Tie some cord between two trees, drape the tarp over the line, and tie down the corners. If you don’t have any rope (or didn’t follow my advice and don’t have a tarp), you can still set up an A-frame shelter with relative ease. Use 2 sticks to construct an A shape, then use a longer branch that runs from the top of the A to the ground.
For extra security, make a few smaller A-frames along the length of the longer branch to help support it.
Cover it with your tarp, bark, or brush the same way you made your lean-to. A-frames using a tarp are especially versatile because you can build them close to the ground or suspend them for use with a survival hammock.
A-frames are effective against wind, rain, and snow. The closer to the ground, the more effective it will be. Remember to build your A-frame with steep walls in snowy conditions to avoid having too much weight accumulate.
The Wedge Tarp Shelter
The wedge tarp is ideal for strong winds, providing that the wind direction does not change. It can go up in just a few minutes, is one of the most secure tarp shelters, and collect rainwater, which can be an actual lifesaver.
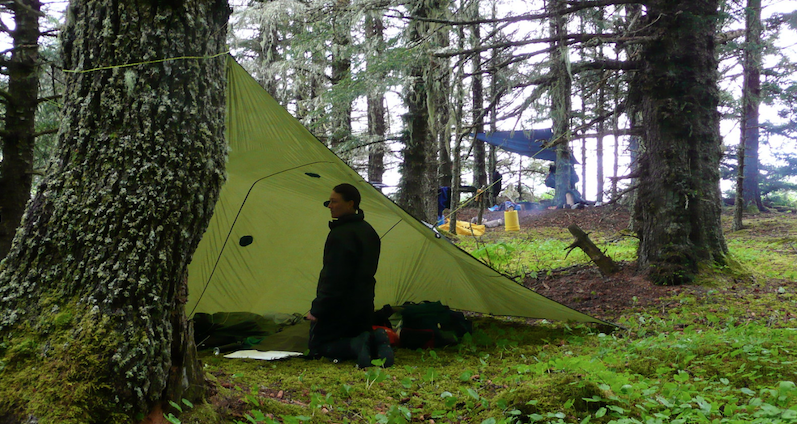
Photo Courtesy of Joseph
Tie one side of your tarp down into the wind, then fasten the center of the opposite to a tree (the best height is just a few inches below your belt). Tie down the remaining corners, and you’ve got a wind-resistant, waterproof shelter that will keep you warm and trap potable water when it rains. For better insulation and wind resistance, tie the far end lower to the ground and use steep angles for the opening. For better ventilation, tie higher with less steep angles.
This is also a great shelter for trapping heat from a fire but be sure to build the fire at a safe distance from your tarp and consider wind conditions that may throw sparks.
The Round Lodge Shelter
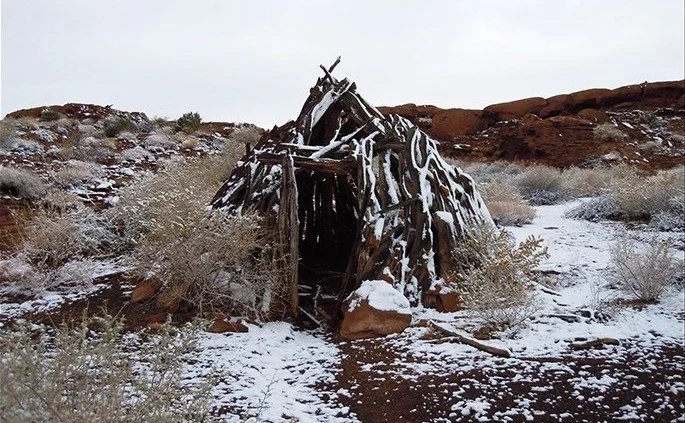
Photo Courtesy of NPS
A round lodge is a more involved shelter but will give you plenty of room and protect you from most basic elements.
Start by gathering about a dozen large, sturdy branches.
Lean them all together and fasten them at the top into a cone shape.
You can then use tarps, skins, branches, bark, mud, or moss to construct the walls. The more heavy-duty the material, the more insulated and protective the walls will be.
Remember to leave an opening at the top if you plan to build a fire and try to position the opening away from the wind.
This will take a bit longer to construct but can provide shelter for several people large enough to build an “indoor” fire.
Extreme Weather
For the extreme weather found in a snowy tundra or barren desert, there are a few shelters you’ll want to know how to construct.
The Double Roof Tarp/Desert Tarp Shelter

Photo Courtesy of Tim MacWelch
The double roof tarp, or desert tarp, is an essential shelter for keeping the deadly desert sun off your back without overheating. It’s been used for centuries in Africa and the Middle East but has been introduced in military training for desert survival as well. You’ll need two tarps or a large tarp to construct this shelter.
Locate or dig a low spot in the ground about 1-2 feet.
Tie the first tarp to stakes a few inches off the ground, then fasten a second tarp about a foot above the first. You can use stakes and rope, or stack large rocks or whatever else you can find. You may also fold over the same tarp for each layer, so long as there is still one foot between them.
This shelter uses thermodynamics to keep you cool and shaded, so you can be safe and also tell your friends that you’re *basically* a scientist.
The Quinzhee Shelter
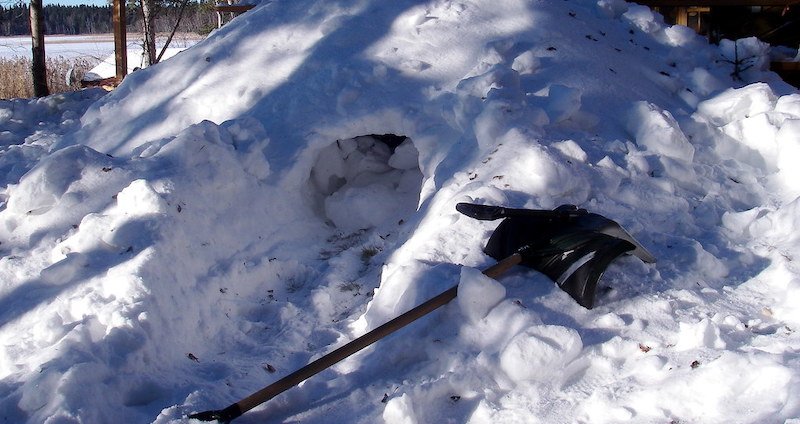
Photo Courtesy of Rick McCharles
For the opposite of scorching heat, a quinzhee is perhaps the best emergency shelter for snowy, freezing conditions. The quinzhee is similar to an igloo, but smaller and easier to create. Once again, a tarp can literally save your life here.
Start by covering any gear you have with a tarp.
Then begin covering it with snow until you’ve created a dome about 2 feet thick all the way around. It’s very important that you pack the snow down tightly as you go along to ensure structural stability of your quinzhee.
Once that’s done, insert 40-50 12” sticks over the surface of the dome, pushing them in until they’re flush with the exterior.
Then, burrow into the dome to retrieve your tarp and gear. Continue to hollow out the dome until you reach the bottom of each stick.
Create a ventilation hole 4”-5” wide at an angle in the roof.
Unlike an igloo, the quinzhee can be constructed using almost any type of snow, making it the quickest and most efficient way to create shelter in freezing temperatures.
The Snow Cave Shelter
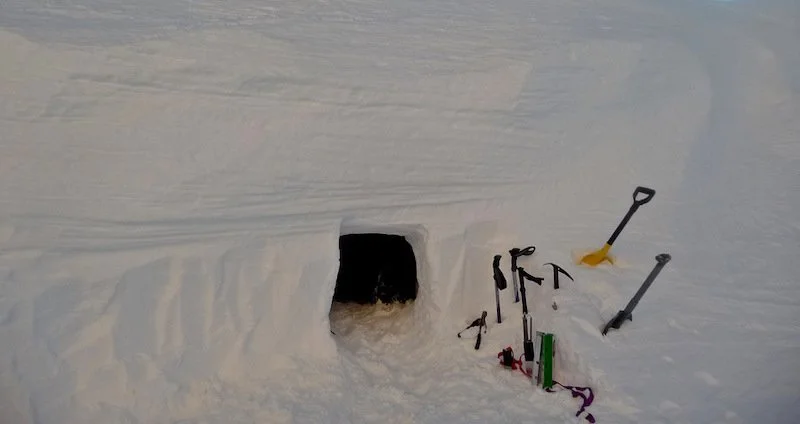
Photo Courtesy of Josh Lewis
For those of you who are looking for more of an ice palace than a basic snow shelter, you can build a snow cave. These snow caves are significantly more complex, will take longer to build, and will require the right type of snow. Snow caves should be a last resort, since poor ventilation or a collapse can kill the inhabitants.
Start by finding a solid snow drift or bank and burrow a tunnel into it from the bottom.
Once you’ve tunneled in, dig up and in again, creating a sort of dome with a sleeping shelf in the highest part of the shelter.
Dig a hole roughly six inches wide in the roof for ventilation and remember that you can suffocate if you don’t get enough fresh air. If you plan to block the entrance, consider additional ventilation.
Again, this is one of the most dangerous shelters, and should only be used in areas with deep, solid snow and no vegetation. If you do have to build an ice cave, be sure to place markers above to warn anyone who may come by of your presence, and avoid a catastrophic cave-in.
We hope that you’ll never need these skills, but they can save your life if you ever do. Try practicing them in the backyard or at a local campground so that you can feel confident in your abilities. Go by a tarp and some paracord right now – and keep it with you.
And remember that planning ahead is the best way to avoid emergency survival situations. Pack well, plan your trip, let others know where you’ll be and when you should return, and don’t take unnecessary risks. We love adventures, and we want you to have a positive one (see what I did there?). By equipping yourself with survival knowledge, you can go forth into the wild with the assurance that you’re ready for any challenge.